Creating Forms
Forms are the core interface of WorkspaceBuilder. Every data collection flow, workflow, and submission starts with a form.
What Are Forms?
Forms are built inside the Form Builder — a drag-and-drop canvas where you assemble components to define the structure, appearance, and behavior of your data collection interface.
Each component you add represents a field or a layout element. Together they define:
- What data is collected
- How it is presented to the end user
- What rules and validations apply
Forms live inside Menus. You must create a menu before you can create a form.
Form Lifecycle
A typical form follows this lifecycle from creation to submission management:
- Form Creation — Select a form type and give it a name
- Adding Components — Drag and drop fields onto the canvas
- Adding Actions — Configure submit actions, workflows, and automations
- Roles and Permissions — Control who can view, fill, or manage the form
- Managing Submission Data — Review, export, and act on collected data
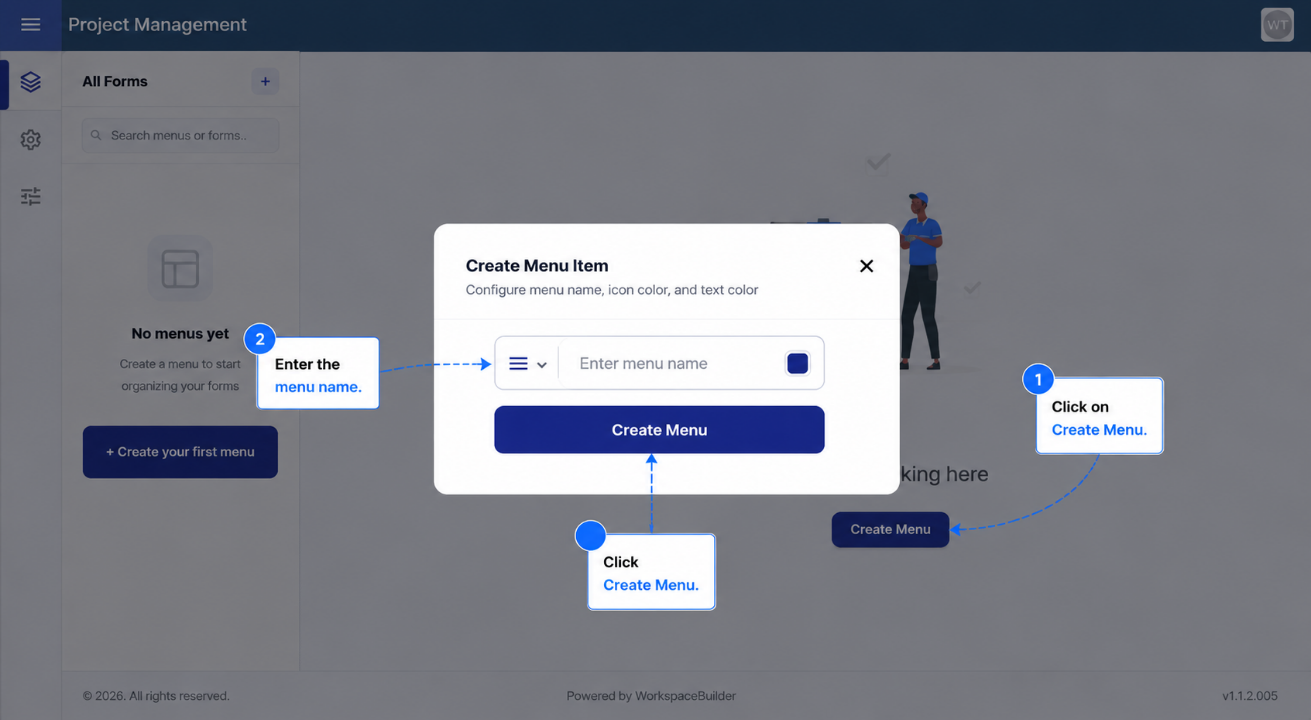
Step 1 — Create a Menu
Forms are organized under Menus in the sidebar. Before creating a form, you need at least one menu.
-
Open an existing project or create a new one. The platform navigates you into the project workspace automatically.
-
Click Create Menu in the sidebar, or use the Create Menu button in the center of the workspace.
-
A dialog will appear with two fields:
- Menu Name — The label displayed in the sidebar.
- Icon — An icon to visually identify this menu group.
-
Fill in the fields and click Create Menu to confirm.
Choose a menu name that reflects the category of forms it will contain — for example, HR Forms, Customer Onboarding, or Finance.
- The new menu appears in the sidebar and is ready to hold forms.
Step 2 — Create a Form
Once a menu exists, you can create forms under it.
- Click the Create Form button under the target menu in the sidebar.
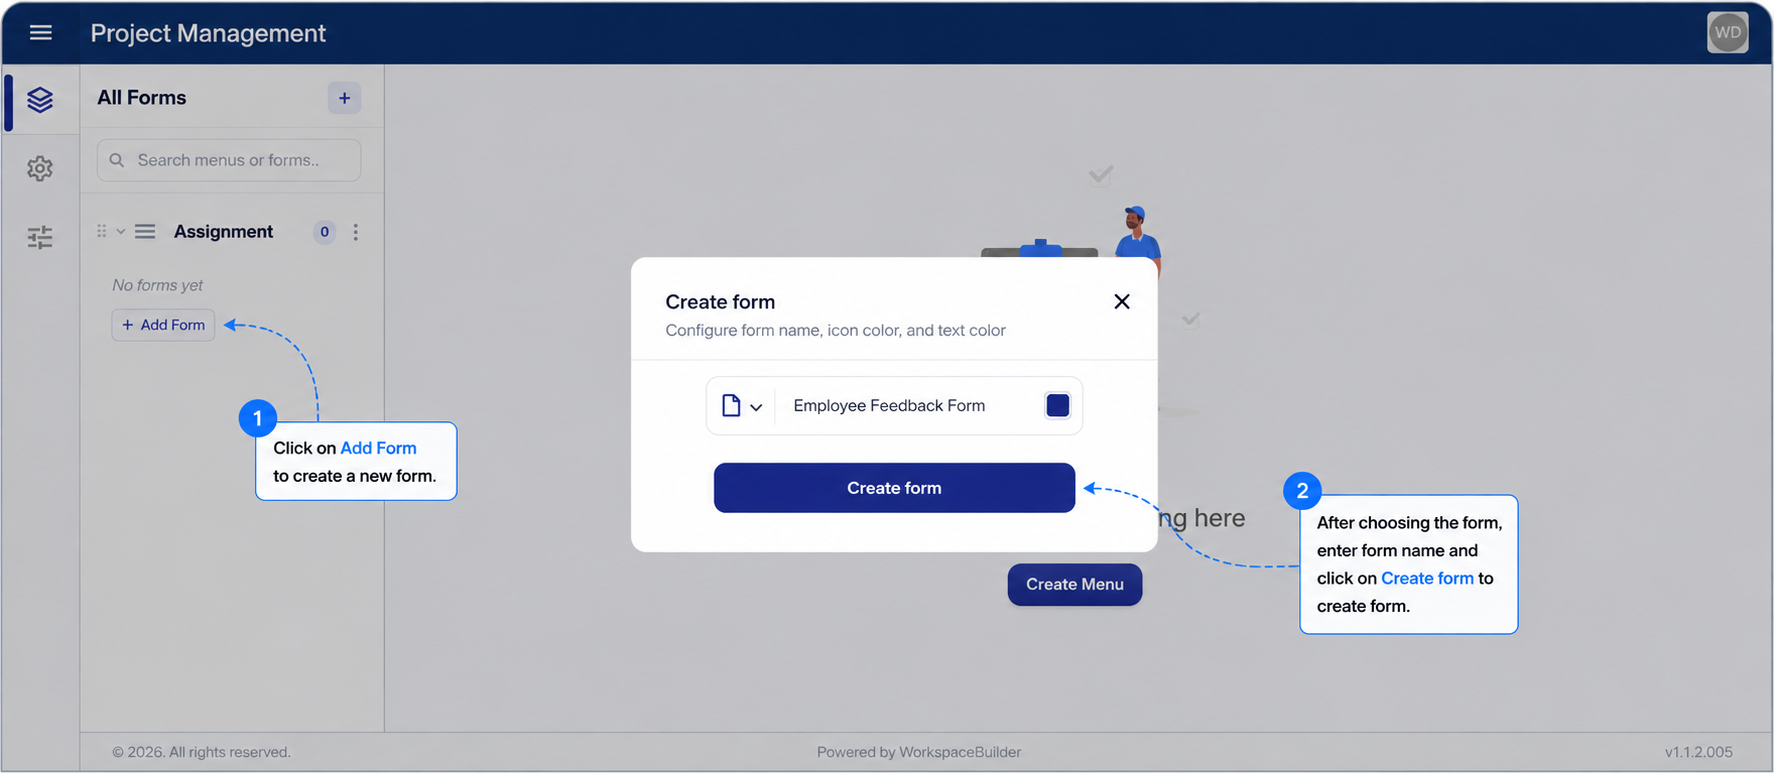
-
A dialog appears asking you to choose a form type:
Form Type Purpose Classic Form Single-page form — all fields visible at once Wizard Form Multi-step form — fields split across guided sections PDF Form Upload a PDF and add interactive overlay fields Dashboard Analytics canvas with charts, widgets, and reports
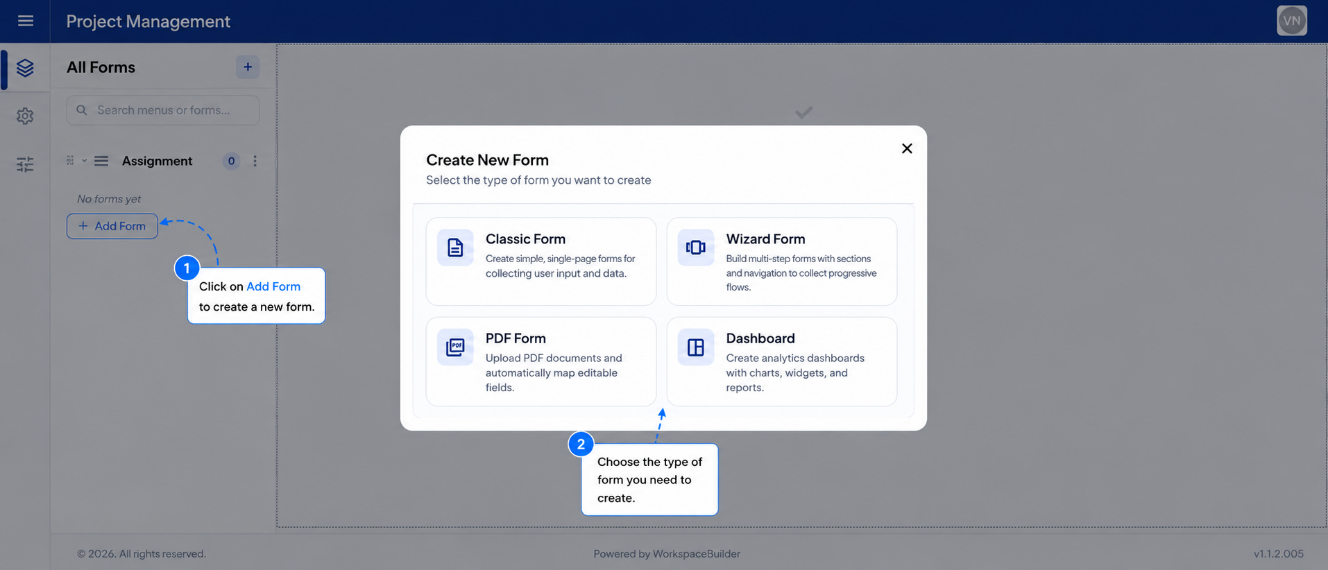
Not sure which type to pick? See Form Categories for a full comparison.
-
After selecting a type, fill in the form details:
- Form Name — A clear, descriptive name to identify the form in the sidebar.
- Icon — An icon displayed next to the form name. Click the icon preview to search and pick one.
-
Click Create Form. The form is created and immediately selected in the sidebar.
Naming Convention
Use clear, consistent names for forms so they are easy to find later.
Employee Onboarding FormCustomer Feedback — Q3Invoice Approval Request
- Generic names like
Form 1,New Form, orTest - Names that duplicate an existing form in the same menu
Icon Selection
Click the icon preview in the dialog to open the icon picker. You can:
- Search by keyword (e.g.,
document,user,chart) - Browse by category
- Click any icon to select it instantly
Icons are displayed in the sidebar next to the form name and help users navigate quickly.
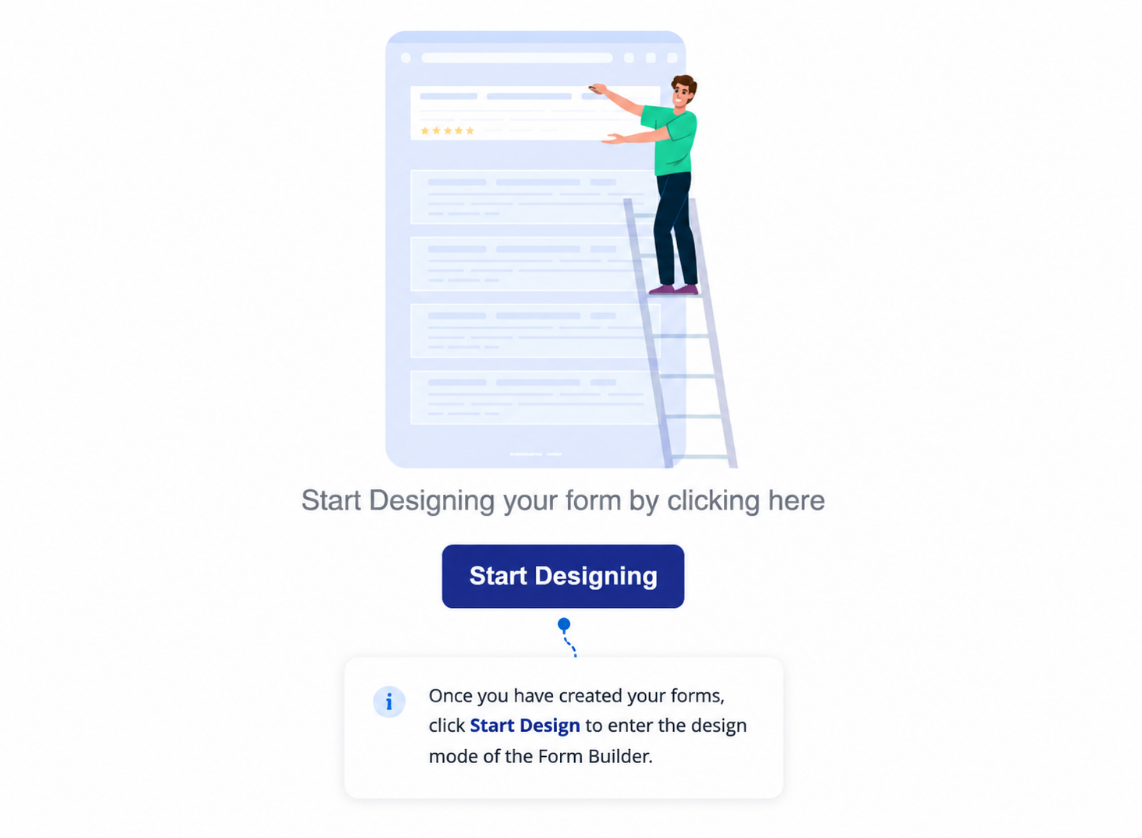
Step 3 — Start Designing
After creating the form, it opens in the workspace ready for design.
- Click Start Designing or the Edit button in the header to open the Form Builder.
- The Form Builder provides a drag-and-drop canvas with a component palette on the left.
For PDF Forms, you are prompted to upload a PDF immediately after creation before the builder opens.
Managing an Existing Form
Once a form is created, you can manage it directly from the sidebar.
Access management options by either:
- Double-clicking the form name in the sidebar, or
- Clicking the three dots (⋮) icon that appears on hover
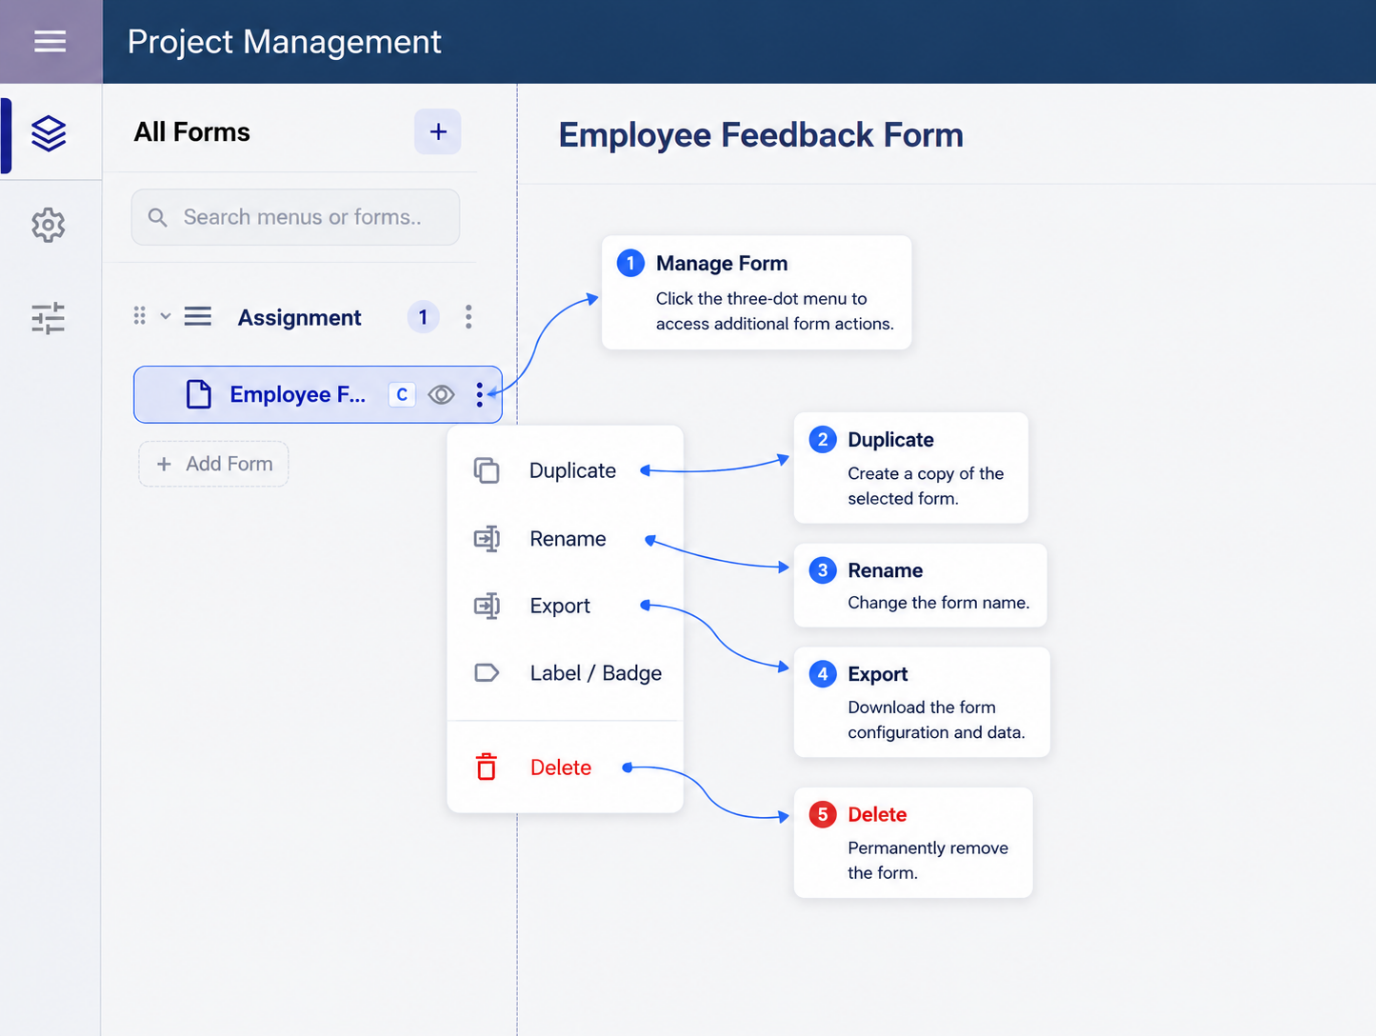
The following options are available:
| Option | Description |
|---|---|
| Rename | Edit the form name inline. The change saves automatically. |
| Duplicate | Creates an exact copy of the form including all fields, settings, and components. Useful for creating variants without rebuilding from scratch. |
| Export | Downloads the form configuration as a .json file. Use this for backup or to import the form into another project or environment. |
| Delete | Permanently removes the form and all its associated data. |
Delete is irreversible. All submission data associated with the form is also removed. Export a backup before deleting if the data may be needed.
Managing a Menu
To manage a menu, click the three dots (⋮) next to the menu name in the sidebar.
Available options:
| Option | Description |
|---|---|
| Rename | Update the menu's display name. |
| Change Icon | Replace the menu icon from the icon picker. |
| Toggle Visibility | Show or hide the menu from end-users without deleting it. |
| Delete | Removes the menu and all forms inside it. |
Deleting a menu deletes every form under it and cannot be undone.