User Management
User Management lets Admins control who has access to the workspace, what roles they hold, and which projects they can work on. Admins can invite individual users or bulk-import them, assign and update roles, view user details, and remove users when needed.
Access: Available to users with the Admin role only. Navigate via the left sidebar.
Page Layout
The page has four main areas:
| Area | Description |
|---|---|
| Header | Page title, subtitle, Settings shortcut, and Add Users button |
| Users tab | Paginated table of all active workspace members |
| Pending Users tab | List of users who have been invited but have not yet accepted |
| Slide-in sidebar | Opens on row click to show user details, role assignment, and additional form |
Header Actions
Settings
The Settings button navigates directly to the Designer view of the default project. Use this to configure the user-profile form that appears inside each user's detail panel.
Add Users
Clicking Add Users opens a dropdown with two options:
| Option | Purpose |
|---|---|
| Invite User | Invite a single user by email and phone |
| Invite Users | Invite multiple users manually or via bulk file upload |
Users Tab
The Users tab lists all active members of the workspace in a table.
Table Columns
| Column | Description |
|---|---|
| Name | Displays a colored avatar (initials) and the user's full name |
| Status | Always shown as Active for confirmed members |
| The user's registered email address | |
| Phone Number | Phone number recorded at the time of invitation |
| Role | A View Roles button that lazily fetches and toggles the user's assigned roles |
| Action | A three-dot menu with Edit and Delete |
Search and Pagination
- Use the search bar to filter users by first name.
- Rows per page selector offers 5, 10, or 20 rows.
- Previous / Next buttons paginate through results.
Pending Users Tab
The Pending Users tab shows users who have been invited but whose accounts are not yet confirmed.
| Column | Description |
|---|---|
| The invited email address | |
| Role | The role assigned at the time of invitation |
Pagination works the same as the Users tab (5 or 10 rows per page).
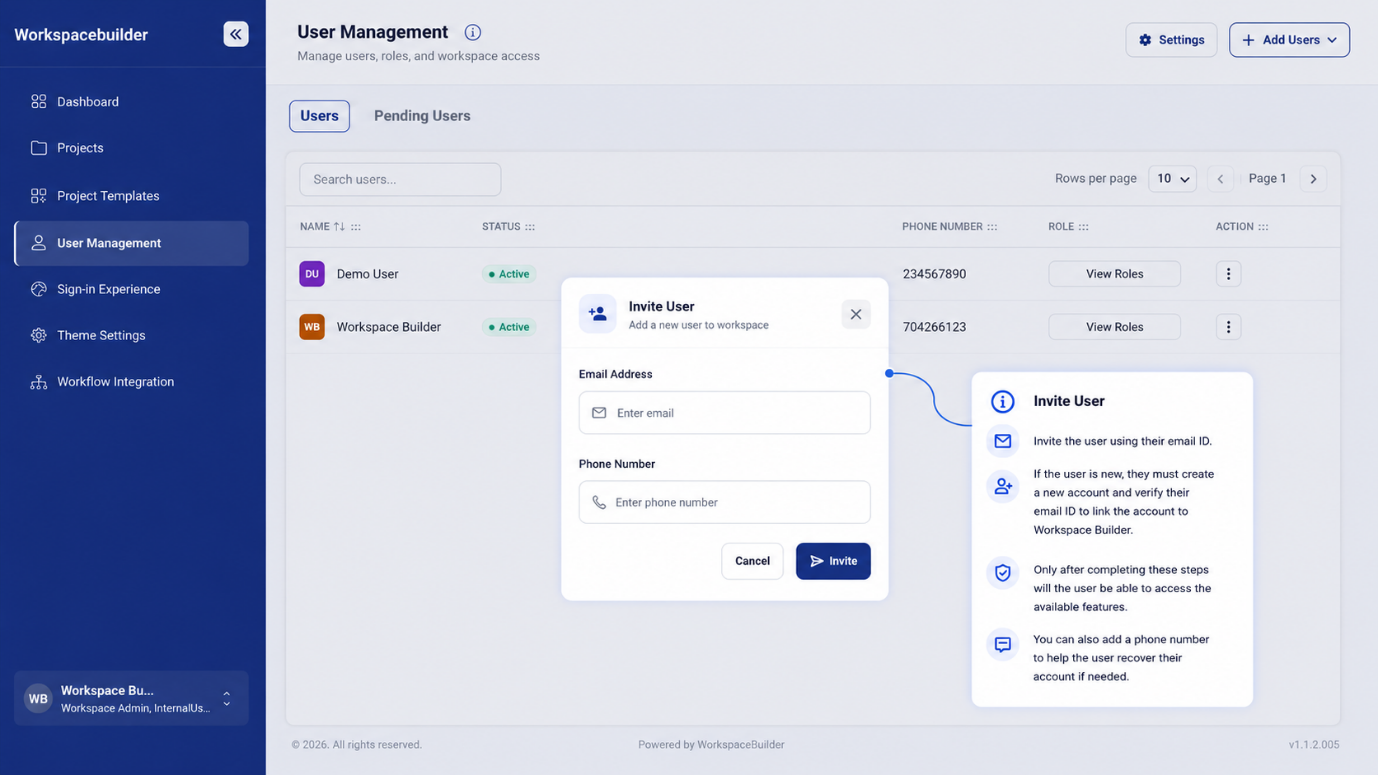
Inviting a Single User
- Click Add Users → Invite User.
- Enter the user's Email Address — must be a valid email format.
- Enter a Phone Number — must be exactly 10 digits.
- Click Invite.
The system sends an invitation email. If the user is new to the platform they must register and verify their email before they can log in.
If the user already exists in the organization, an Already Exists error is shown and no duplicate invitation is sent.
Inviting Multiple Users
Click Add Users → Invite Users to open the bulk invite modal. Two methods are available:
Manual Entry (1–25 Users)
Enter comma-separated email addresses or phone numbers in the text area and click Invite Users.
Bulk Upload (Up to 10,000 Users)
- Click Download to get the spreadsheet template.
- Fill in the user details in the template file.
- Upload the completed
.xlsxfile. - Click Invite to send all invitations at once.
User Detail Panel
Clicking any row in the Users table opens a slide-in panel on the right. The panel has three sections.
User Details
A read-only card showing the user's Email, Phone, First Name, and Last Name.
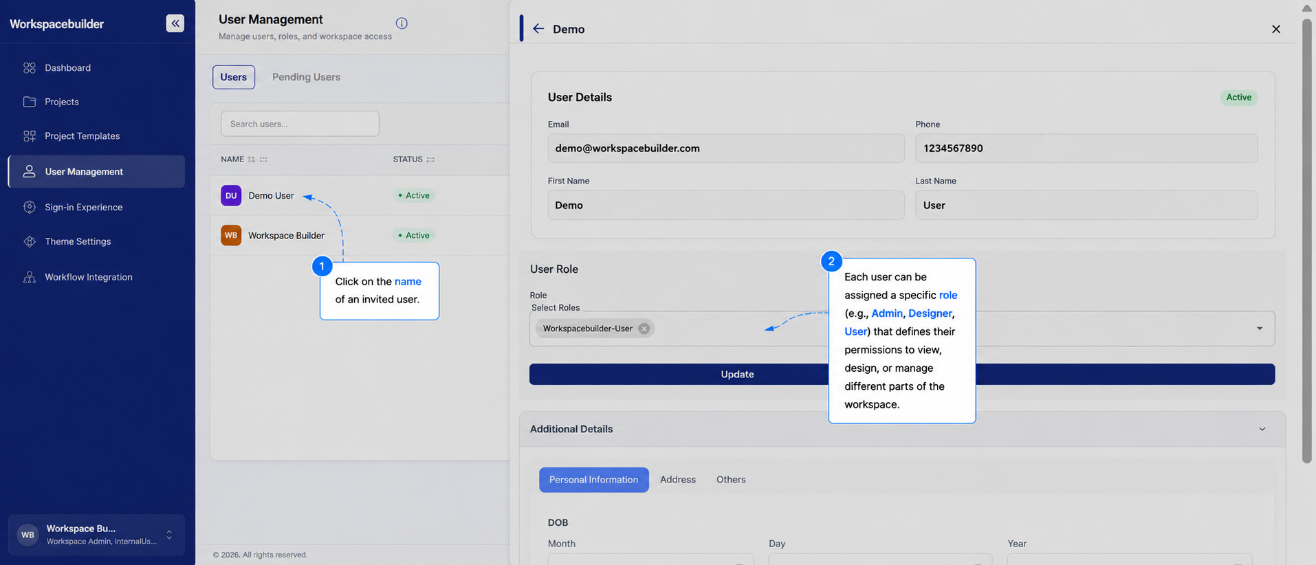
Role Assignment
An Autocomplete multi-select dropdown lists all roles available in the workspace. Check or uncheck roles to modify the user's access level, then click Update.
Role descriptions:
| Role | Access Level |
|---|---|
| Admin | Full access — manage users, settings, projects, and forms |
| Designer | Create and modify projects and forms; no admin controls |
| User | View and fill forms; cannot design or manage the workspace |
| Internal User | Similar to User but restricted to internal-only content |
Restrictions: You cannot update roles for the organization owner's account, and you cannot modify your own roles.
Additional Details
A collapsible Additional Details section renders a Form.io form from the workspace's default project. This form is linked to the selected user and can be used to capture extra profile data.
- If the user already has a submission, the form pre-fills with their saved data.
- Submit the form to create or update their profile record.
Deleting a User
- In the Action column of the Users table, click the three-dot menu.
- Select Delete.
- A confirmation dialog appears showing the user's email.
- Click Delete to confirm.
Restrictions:
- You cannot delete the email address linked to the organization (the org owner).
- You cannot delete your own account — ask another Admin to do so.
Workspace Info Panel
Clicking the info icon in the page header opens a separate sidebar with workspace-level settings:
| Setting | Description |
|---|---|
| Workspace ID | Read-only unique identifier for the organization |
| Subdomain | Editable subdomain used in the organization's login URL |
| Workspace Name | Display name of the organization |
| Address | Physical or mailing address of the organization |
| Country | Country where the organization is based |
| Company Email | Primary contact email for the organization |
Changes to the subdomain and org details are saved separately using their respective Update and Save buttons.
Project-Specific Access
Inviting a user to the workspace grants them workspace-level access only. To let a Designer or User work on a specific project, the Admin must also invite them through Project Settings.
Steps to Grant Project Access
- Open the target project from the Projects page.
- Go to Project Settings.
- Click Invite.
- Select the user's email from the list.
- Choose their role for that project.
- Click Invite.
After inviting, click a username in Project Settings to view their current role and access details.
Switching Between Organizations
Users who belong to more than one organization can switch at the login page.
- The Admin invites the user through Workspace Settings.
- The user logs out of their current session.
- The user logs back in with their email.
- They select the target organization from the dropdown on the login page.
Once invited, the organization name appears automatically on the user's login page.