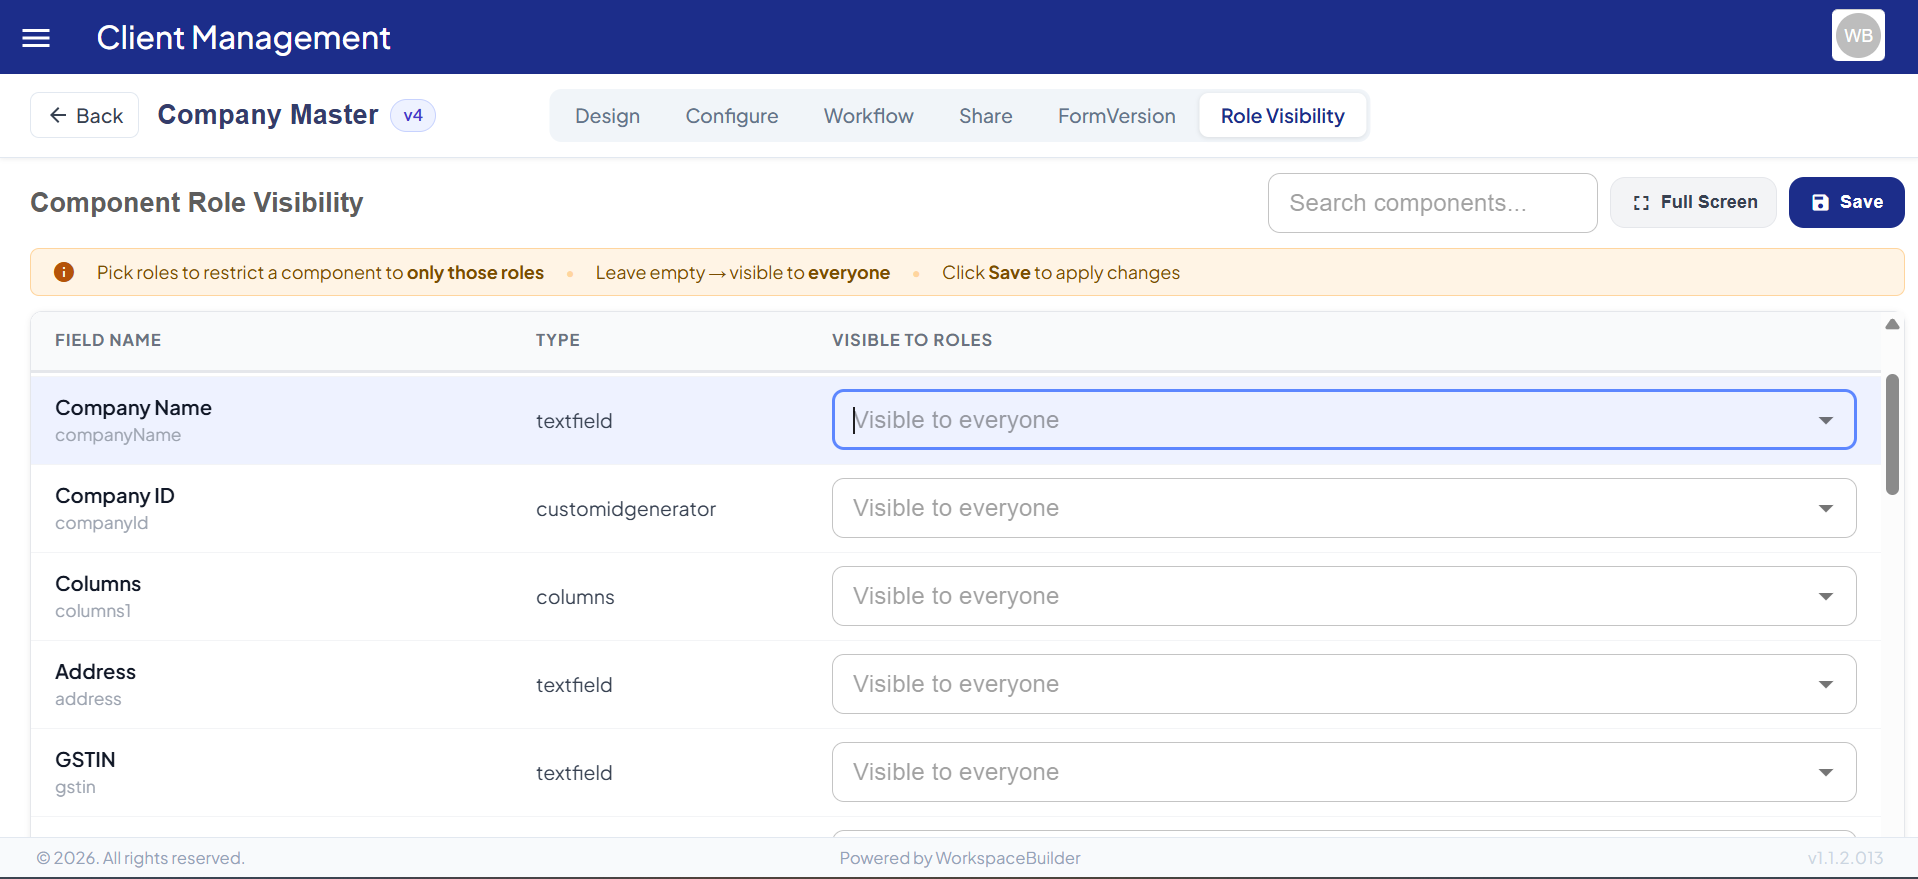
Component Role Visibility
The Component Role Visibility tab lets you control which roles can see each individual field on a form. By assigning roles to components, you can create a single form that shows different fields to different users — no need to build separate forms per role.
Overview
Every component in a form can be restricted to one or more roles. When a user opens the form, only the fields their role is allowed to see are rendered — all others are hidden automatically.
| Behavior | Result |
|---|---|
| No roles assigned to a component | Visible to everyone who can access the form. |
| One or more roles assigned | Visible only to users holding at least one of those roles. |
The Role Visibility Table
When you open this tab, all components from the form are listed in a flat table — including fields inside layouts like columns, grids, and tabs.
| Column | Description |
|---|---|
| Field Name | The display label of the component. The component's internal key is shown below the label in smaller text. |
| Type | The component type (e.g., textfield, select, datagrid, columns). |
| Visible To Roles | A multi-select dropdown to assign which roles can see this component. Empty means visible to all. |
Assigning Roles to a Component
- Open your form and navigate to the Role Visibility tab.
- Find the component you want to restrict — use the Search bar (top-right) to filter by label or key.
- Click inside the Visible To Roles cell for that component.
- A dropdown lists all available roles in your project. Select one or more roles.
- Selected roles appear as chips inside the cell.
- To remove a role, click the
×on its chip. - Click Save to persist all changes.
If you leave the Visible To Roles field empty, the component remains visible to everyone with access to the form.
Search and Filter
The Search bar (top-right of the table) filters the component list in real time. It matches against both the component label and its internal key.
This is useful on forms with many fields — type part of the field name to jump straight to it instead of scrolling.
Fullscreen Mode
Click the Full Screen button (top-right, next to Save) to expand the table to the full browser window. This gives you more space when working with forms that have a large number of components.
- Press Esc or click Exit Full Screen to return to the normal view.
Saving Changes
Role visibility changes are not applied until you click Save.
- The Save button shows a loading spinner while the update is in progress.
- A success notification confirms when changes have been saved.
- If the save fails, an error notification appears and no changes are applied on the server.
Tip: Make all your role assignments across multiple components before clicking Save — a single Save call updates every component at once.
How Nested Components Are Handled
Role visibility works across all layout types. Fields inside the following container components are all individually listed in the table and can each have their own role assignments:
| Container Type | How children are listed |
|---|---|
Standard layout (columns, panel) | Each child component appears as its own row. |
| Grid / Table rows | Each cell's components are individually listed. |
| Tabs | Components inside every tab are included. |
| Nested forms | Sub-components are walked recursively. |
When you save, role assignments are written back into the original nested structure — the form schema is preserved exactly.
Info Banner
At the top of the table (in normal view) an amber banner summarizes the key rules:
Pick roles to restrict a component to only those roles · Leave empty → visible to everyone · Click Save to apply changes
Quick Reference
| Task | Steps |
|---|---|
| Restrict a field to specific roles | Find the field → click Visible To Roles → select roles → Save |
| Make a field visible to everyone | Clear all chips from Visible To Roles → Save |
| Search for a specific field | Type in the Search bar (top-right) |
| Work in fullscreen | Click Full Screen → press Esc to exit |
| Save all changes | Click the Save button (top-right) |
Example Scenario
A Leave Request form has a Manager Comments field that should only be visible to users with the
ManagerorHR Adminrole — not to the employees filling out the form.Steps:
- Open the form → go to Role Visibility tab.
- Search for
managerCommentsin the search bar.- In the Visible To Roles column, select
ManagerandHR Admin.- Click Save.
Result: Employees who open the form will not see the Manager Comments field at all. Only users with the
ManagerorHR Adminrole will see it when they open the same form.
Important Notes
- Role visibility is enforced at render time — it does not affect form submission or data storage.
- Roles available in the dropdown are pulled from your project's role list. If a role is missing, ask your project administrator to create it first.
- Changes made here apply to the live form immediately after saving — no republish step is required.